Showing posts with label acrylic. Show all posts

Saturday, 16 August 2014

My Experience with the Indigo and Lichen Beret

When we moved, as a kind of reward for having to go through the whole moving business again I rewarded myself with a big order of books and magazines from the Interweave store. One of them was All New Homespun Handknits and one of their prettiest patterns was the Indigo and Lichen Beret by Jeannine Bakrigs.
I really did enjoy this pattern, even after the puzzlement near the end. Even though it starts at the crown on DPN's it was easy, the increases were simple and the instructions very clear. The chart was easy to follow and everything was going well until I hit the final 3 rows of the stranded chart where there were a series of peculiar decreases to incorporate.

I was a bit bemused but, nothing daunted, proceeded to try and follow the instructions...

...it did not go well.

The stitch count which up to that moment had been proceeding along the lines set down now made no sense at all. I couldn't even understand how to do one of the decreases - Sl2, k2, p2sso . How's that?? I looked at the back in the glossary, nothing there. What the heck??

Anyway, I continued, assuming that this was a usual slip 2, knit 1, pass 2 slipped stitches over knit stitch and looked at the final row.

It looked like crap! The stranded design had become hopelessly garbled, wasn't following any of the previous colour set ups. But I knit on regardless because, you know, bloody minded-ness is an essential part of the knitter's arsenal in morbid denial!

I finished the chart section and went on with the 3 rows in the main colour decreasing for the brim but as I began to knit the 5 stitch I-cord bind off I finally really looked at what I had.

The pattern called for there being 133 sts in the final round before you started the bind off.

I had 92.

This was so not going to work. So I unravelled back to the initial problematic rows in the stranded pattern. I had a good hard look at the instructions, especially the stitch count at the end of the crown section of the beret before I started the chart and the stitch count at the beginning of the first decrease in the main colour for the brim.

And then I made an executive decision.

I continued knitting the remaining rows of the stranded chart and just ignored the decrease instructions. The design followed seamlessly and made sense. Then when I knit the 3 rows of main colour as before, they were the only decreases I did. I had the stitch count I should and the bind off went off with out a hitch.
And I had a beret that looked very much like the original picture!
I blocked it over the largest plate I have in the house. (Doesn't the design look lovely? All the different colours! Six of them besides the main colour!)
This was, like I said from the beginning, a really easy pattern, even excepting the weird blip with the stranded  chart and I doubt that's the original designers fault. It's probably just a mis-placed instruction on the wrong chart. But if someone can make the original instruction make sense and keep the stitch count accurate, I'd love to hear about it!
 But for me, I'm really happy with my finished beret.
It looks like the picture, the stranded border is nice and crisp in detail,
And it fits and I can wear it. And instead of just collecting pattern books as I'm prone to do, I actually knit something from one!  Extra points me!!
Bye now!
Dx

Wednesday, 27 March 2013

Now for some Cute Instant Gratification

After I finished the vest I needed something fun and QUICK. The vest had been heavy and although a simple knit it had been a lot of stitches. So I decided to do one of the few toys I have in my queue. I'm really glad I did. It uses a tiny amount of yarn too, so great for scraps!


 It was a little fiddly and in an attempt to do as few repeats as possible I messed up some of the instructions along the way but the finished result exceeded my expectations. She is so cute!!
I will definitely be repeating this pattern. Very basic and very enjoyable. So much scope for adding personality to the little cutie!

Thursday, 15 November 2012

Knitted Vintage Dress Experiment

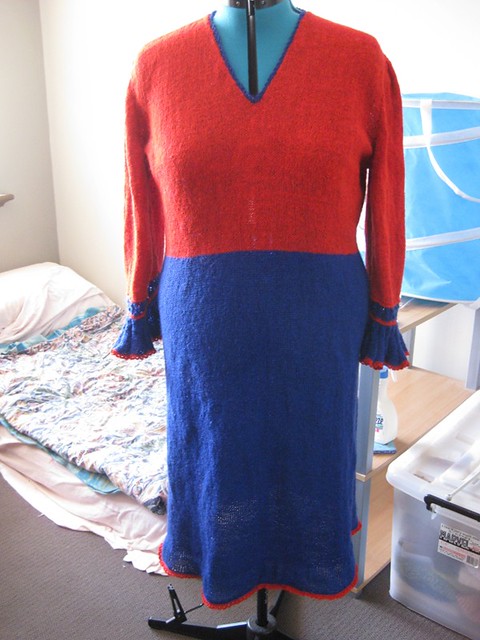
I got brave and set about attacking a large project and knit a dress from a vintage pattern. I had just the pattern I wanted to try and it didn't look too complicated (don't you hate it when you tell yourself that on no other evidence than the picture??)
I had two cones of Gemini Acrylic 5ply which I thought would make an interesting contrast (besides realizing that the blue was going to run out long before I finished the whole dress. Ah well. Needs must.)  
And it was easy...too easy! 18 inches of stocking stitch which I chose to do in the round since the idea of having to do it separately twice  made me feel ill! But it seemed to go on FOREVER!! But finally I got to the end of that and started with the red for the bodice.
Now it started to look more like a dress and not an endless tube! It wasn't difficult doing the shaping for the v-neck and the armholes (had to go back to straight needles for that!) and quickly progressed through the sleeves. But that's where I finally hit some problems!
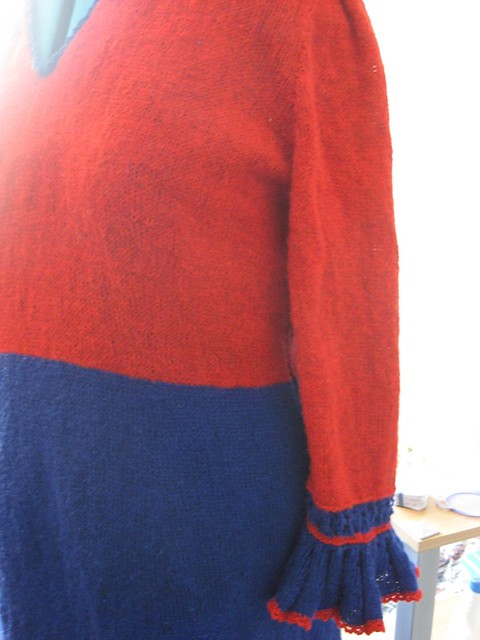
Do you see the ruffle here? It took me 5 tries to get the directions right! I'm the only one who can probably notice but the increases on one sleeve are much looser than the other sleeve. It took me a while to figure that out. And the lace just before the ruffle? That I fudged...a lot! I ended up getting a pattern from my Barbara Walkers stitch collections to find a pattern like the one I could barely see in the picture and used that. I simply couldn't get the pattern as written to make any sense at all!! But at last...I finished it!
...well, not quite...
As hard as I tried I couldn't understand the instructions for the crocheted edge that goes around the neck and ruffles. Crochet is SO not my thing and in the end I fudged this too. Or I might have been doing as I was supposed to but I just followed what the picture looked like. I also added it to the skirt because I thought it looked nicer that way.
So, huzzah!! I did it!
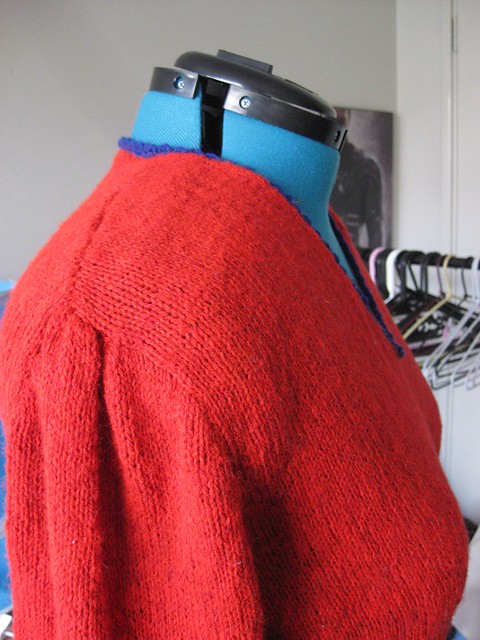
But there is something here you may have noticed and I didn't until I tried it on. The shoulders are hugely wide!! You'd have to be impossibly well built to be able to wear this or wearing killer shoulder pads! 
It hangs over my shoulders by about 5cms. I tried to convince myself that it wouldn't matter but it does, oh heck it does!! So it's been relegated to the naughty corner so I can cogitate on it and figure out what my best option is with it. It might have to wait till winter. It is truly horrendous trying this on in 30C heat!
But it has been a great experiment :)

Happy knitting :)

Saturday, 24 September 2011

Another Seamless Shirt done!

I forgot to put up another garment for myself that I finished while I was in Canberra. I really love seamless knits and I wanted to knit something light that I could possible wear during the spring when the weather's a little iffy. So I found Silken Straw Summer Sweater by Purl Soho on Ravelry and pulled out two cones of acrylic I'd picked up at various op shops. Since both yarns where very thin (the grey one looked about 1ply!) I worked them held together which made a quite passable 4 ply yarn.
Then I got started. It's unlike most seamless shirts I've knit that it started from the bottom and finishes at the top. I modified the hem edge on the bottom and the sleeves because I hate these rolling up so I garter stitched them for about  10 rows. It grew pretty slowly for quite a while.
Then I finally got to the fun stuff while I was at Daughter's. Finished the sleeves, did the I-cord bind off around the neck line, washed, blocked and worn! Was and am so pleased with the result from two ordinary yarns that I couldn't have used alone but together made this lovely heathered grey shirt!
One yarn was light grey with a slight halo and the other one was a smooth yarn in a subdued white, almost the palest grey. And it fits which I always think is a bit of a miracle when I knit stuff because I haven't the patience to do a tension swatch and the few times I have my tension when knitting the whole garment is completely different! But there we go.
Happy Knitting :)

Sunday, 8 May 2011

As the weather turns chilly...

Dear Daughter has begun to notice just how cold Canberra can be (and it's only Autumn!) and put in an order for some gloves but she wanted the convertable kind, Fingerless gloves with a flap that you can slip over them so they look like a pair of mittens. No problem! said I.

Have wanted to have a go making these so it was a perfect excuse and I found a lovely pattern off Ravelry for just the thing! I used 8ply which in retrospect is a bit heavy but they are lovely and warm and I wanted something in a pretty colour that would put up with indifferent sorting when doing the laundry. I'm not spending my time lovingly crafting a pair of woolen mittens only for them to get tossed in the wash with anything, including Army fatigues and coming out the size of a postage stamp! So Acrylic it was! Here are my results.


Aren't they lovely? And they are so snoodly warm! I hope she loves them. I put press studs on the back of the flap and the top of the wrist so when they're folded back they wont flap around and then I sewed a little felt flower over the press stud on the flap with a hole for the press stud to go through to make it look prettier.

It was a wonderful pattern too. If you're looking for something like this look on Ravelry for Broad Street Mittens by Janie Cortese. Very easy directions and not at all confusing, well, I didn't find them so anyway :)

I finished these a few days ago so this Monday, into the post they go. I hope her little fingertips will hold out until they get there.
Happy Knitting :)

Friday, 22 April 2011

Everything old is new again!

I have been collecting vintage patterns for ages and have been desperate to actually try and knit something from one of them so I took the plunge! I chose a simple looking shawl/shrug-like covering that had no lace involved and only one page of instructions!

Perfect!
I cast on with a lovely lavender purple acrylic I already had in 5ply and using the needles suggested, bravely cast on! I used a circular needle however for this since I was pretty sure I wasn't going to be able to keep control of over 100 stitches on any of my straights, however long they were!
The knitting itself was pretty boring and not really that well explained in the tiny amount of instruction. Once I worked out what I thought they wanted and placed stitch markers to keep track of stitch increases it got a bit easier...right up to the point, half way through when I ran out of yarn!
I only had that one ball but never fear! I still had the ball band and an intended visit to town (118kms away!) for the next day. No problem! I'll just buy another ball tomorrow.
But alas, disappointment and frustration greeted me! Although I could find the exact yarn required, I could not find the exact dye lot! Not for love or money! So I bought another ball as close to what I had begun with as I could and consoled myself with making it a design element.
So off I went again and soon (although not nearly soon enough to suit me!) I had finished and I had...a great big sheet of knitting.

Now to follow the very brief instructions on how to construct the shawl from this great sheet I had before me.

First mistake: I decided to iron it so it would lie flatter and (I thought) be easier to fold into the desired shape. Result? I ended up with an enormous great sheet of knitting that required either the whole dining table or my ironing board to try and make sense of what I had before me.

Second mistake: It doesn't matter how hard I try I will never get the desired shape if I keep confusing the bottom of the shawl with the top. Once I'd realized what I was doing wrong I did actually start to make headway!

I soon realized however that there was simply no easy way to do this! Folding down the neck and the final edge of the shawl was relatively pain free but then there was the issue of the four tucks, great big long ones! In the end after much experimentation and annoyance I had to sit and labouriously tack together each fold using long quilting pins to hold the folds in place on the right side and a metal ruler of the right dimensions to stabilise the tucks sufficiently so I could sew them together from the back. It took all day.
Then I had to shape the front opening by folding the tucks together to give it the sweeping appearance around the body. Not too hard but then I realized that all the tucks just flopped down from their positions unlike the one in the picture where they seemed to sit with no effort at all, perfectly upright. Damn! Out came the needle and thread again.
I had to tack each fold to where it needed to sit and that was difficult without the stitches becoming to obvious! But after another day of handsewing it was done! I crocheted around each front closure so it looked tidy and finally swept it around my shoulders...
It seemed a little...big?
I attached the hook and loop closures and sewed on the ribbon but it was no use...

It was just too big and wouldn't sit nicely on my shoulders and I didn't like how the closure hung.
Poop!
So I looked at it for another day and decided what I was going to do. I lay it over my shoulders and folded the front edges over each other so the closure became slightly assymetrical. That way I didn't have to add a bulky pleat to the back to try and take out excessive length which would ultimately ruin the drape of the shawl and I didn't have to fold over the front edges, creating clumsy, bulky material at the front. I sewed one hook and loop closure to the centre of the closure going under the top to fix it in place and the two hook and loops on each corner of the top layer to anchor it to the front of the shawl. Then I sewed two faux ribbon ties to the two spots so it kind of looked like they were keeping the whole thing together. It was an improvised kind of solution, I used buttons to fix the ribbons in place but I may sew them down later since they still tend to move slightly and I don't like it when they don't sit even. But otherwise? I am very pleased with the results :)

It sits beautifully, is soft and warm. Not the least nasty and squeaky like some of the old acrylic used to be like. You can clearly see the colour changes between balls of wool but fortunately they fell on a fold so the change isn't as apparent as it might otherwise have been had it happened midway through a length of plain knitting. It falls right on the fold ridge. Couldn't have planned it better if I'd tried :)
So there we have it! My first truly vintage pattern worked and completed. And now I know some things.
Most notably: Few instructions are NOT necessarily a good thing! It's nice to figure somethings out yourself but if there hadn't been a picture with this pattern I would have totally failed!! I'd never have figured out how to put the thing together and even with it there are elements were I had to go "Stuff it!" and improvise. It was necessary and now I have this lovely garment from a beautifully attractive time brought back into the present.
I am satisfied!

Happy knitting :)

Tuesday, 1 March 2011

And now, for something a little different!

But not a walk in the black forest!(sorry, allusion to an episode of The Goodies!)
I wanted to get rid of some of the acrylic yarn I'd bought to make my Cobblestone Jumper, of which I still have something like 7 100g balls left! And the pattern for a cat bed or Snuggly caught my attention. It was really easy too. Whipped it up relatively quickly, added the wadding to the rim, sewed her up and hey presto! 2 Balls down and a cute nook for the cats!

But there are things I would change if I did it again. Cast on more stitches would definitely be top of my list. Although I doubled the yarn I was using I forgot to go up a couple of needle sizes so although it's nicely compact it's not really very big. Case in point:

This is Tippy, my senior cat. He's actually pretty diminutive for a cat and he just fits in it. But at least he seems to like it and it was a very quick knit. Probably no more than a couple of days and I think it only took that long because of the large gauge yarn and the smaller than necessary needles made the knitting a bit stiff. But it's cute and That's all that matters!

Happy Knitting :)

Thursday, 27 May 2010

And one more time!

I have finished the second shrug using the last of my Patons Foxy yarn. Lovely stuff! So soft!


I used every last bit I had, mostly in extending the sleeves and I used a green acrylic blend reclaimed from a jumper for the bottom hem and the sleeve cuffs. I added some ties too, just to secure under bosom if desired.

It looks really nice...not on me though. Looks absolutely horrendous on me! More for the younger set, Brianna's age definitely!


Well, I think I've experimented enough with this one. There's not really much enjoyment knitting something I can't wear. But there is being able to enjoy the pleasures others receive in having something individual for them to shine in!

But I think I'll turn my attention back to Brianna's top now.

Happy Knitting :)

Friday, 21 May 2010

Look what I found!

Brianna and I went to Denmark today to do some shopping since we're having some friends over for a meal Saturday night. The pantry's pretty bare at the moment so we had to buy some provisions and definitely some meat!
But while there we went into the Denmark Co-Op. I've never been in there before. I may regret having gone in there today! Such a lot of lovely pretty things!


We spent over $20 there!
Buttons for a top I'm knitting for Brianna.


Also a DVD cleaner that'll hopefully help us play my "Bones-Series 4" discs which are a pain to get the DVD player to read, pins, needle threader, clear plastic press studs and point protectors for knitting needles. Then we decided we DEFINITELY needed to leave before we got into real trouble!


The Red Cross Op Shop was open so, just before getting the shopping done we thought we'd just duck in and see if they had anything interesting. Were we in luck!
Brianna found a jigsaw puzzle that my Mum had and I found-the MOTHERLOAD OF CONES!!


The large cones in the peach, green and saffron are in some cotton blend because when I burnt some strands it didn't melt or smell plasticy. It kind of burned away into nothing and smelt kind of woody. It's all 3ply but I have some dress patterns and shawl and bloses as well that I'd love to have a go with this stuff! I knit up a small swatch and I'm just waiting for it to come out of the washing machine to see how it washes up. It knits lovely with such a soft drape. Aaaahhhhh.


I also got some vintage knitting patterns. In the end we donated under $20 to the Red Cross!
Then, struggling hard under the desperate compulsion to look for more op shops and try my luck, we went grocery shopping instead. It came to under $200.
But it wasn't nearly as much fun as looking through the Co-Op or Red Cross :)