Showing posts with label in the round. Show all posts

Thursday, 1 August 2013

Brain Wave!! Why not knit something for my Family??

It's kind of sad how long it's taken me to think of this but I had to recently re-order my wool room (it had begun to infest my sewing room! Gah!!) and realize that I had quite a bit of yarn...
...yeah, I know! Shocker, huh?
Anyway I figured since I had two practically adult sons I could ask them if they'd like me to knit them a jumper and If. They. Would. Wear. It! It really doesn't count if I go to all that effort and they don't wear the article I've made!
After much assurance that Yes, they'd love that and Yes, they would wear it I went ahead and began looking for a nice men's jumper with hoodie pattern.
Do You Have Any Idea How Hard That Is To Find Such A Thing!!!
I could not believe how difficult it was to find just what I was looking for! I wanted a jumper with multiple sizes, My eldest son is average height and of extremely slender build while his little brother is nearly 6 feet (and at 19, still likely to grow more!) and is built much more solidly that his bantam-weight brother!  Also I wanted a jumper with pockets. Both boys carry their phones everywhere and it was a special request from the oldest that the pockets be big enough to put a phone and a wallet in.
Ookay...
It had to be a hoodie because both boys think a knitted jumper would look too much like an article from grandpa if it didn't have a little cool added to it and I had to be able to convert the one for the youngest into a zip front because he "doesn't DO jumpers".
Great, I mean, how hard could that be to find??
I absolutely CRAWLED through everything I could find on Ravelry on men's patterns, both free and buy-able. Every time I found something it was never quite right and I soon began to get desperate! Then I found it! On the Knitty site there was a jumper called the Donut Hoodie
. While it didn't have instructions for a zip front other knitters had been able to convert the pattern to accommodate a zip. That's all I needed! It had a kangaroo pouch pocket at the front and looked just the ticket.
At first I kind of tried to wing it. I had a heap of beige acrylic and lovely charcoal acrylic that was beautifully soft so I just followed the instructions without doing any test swatch or anything on the needle sizes suggested. About a week later when I'd finished the bottom up and past the kangaroo pockets (another bonus, the pattern is knit in the round! No seams!!) I had an opportunity to visit my boys so I took the pattern and what I'd knit so far and decided I should take some measurements of them both just to make sure that what I knit actually fits them.
I'd already begun to have some doubts about the gauge I was knitting at but they were soon confirmed as soon as I showed eldest son the process so far. The gauge made it look like thick mesh bagging all over him and I could tell he wasn't hugely happy about the subdued colour tone. Afterwards I had a good hard look at all my work, swallowed hard and pulled it all out. EVERY LAST STITCH!!
Then I started going through the measurements I'd taken and looked at the range of acrylic yarns I had.
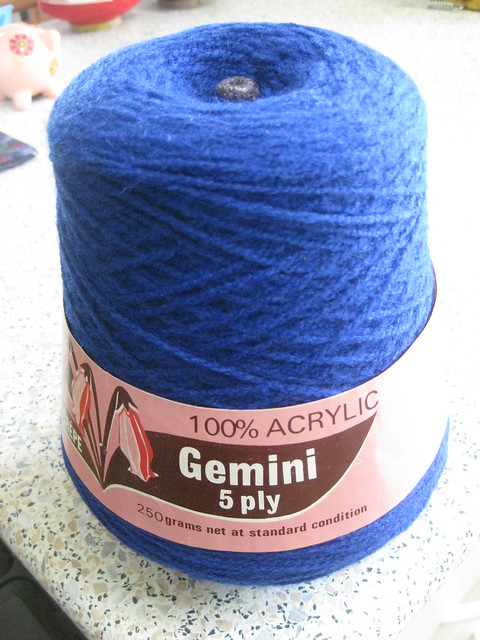
It had to be acrylic because I'm not knitting anything that can't take the cavalier treatment of bachelor wash days in their stride. I couldn't bear to get a phone call telling me that the jumper I spent ages on now fits their dashboard's bobble-head figure!
Anyway, that said, eldest son is a mad Holden fan so using the same grey I'd used before for the stripes I now used for the body of the whole jumper. I also chose a grey and a red for the stripes. Okay...here we go!
I knit a small swatch (I'm an absolute baby when it comes to swatching. I just want to start my project!) But it showed that the fabric looked better on 4.5mm needles which meant I'd be knitting the medium size even though measurement wise on the original pattern he's actually the small. But no matter! Tally-ho!!!
Body finished. Kangaroo Pocket at front.
I was very happy with the colours I chose, it was much easier to imagine my eldest actually wearing this and the knitting of the pocket was easy and the stripes lined up nicely. Once the body was done I progressed to the sleeves. I did not like them nearly as much! Knitting them in the round was a pain and I probably made it worse by doing them both on the same circular needle. Actually they broke that needle as I neared the end and I had to swap them over to another one to finish them. Because my stripe pattern relied on a colour pattern between the the two colours I ended up having to knit the sleeves longer than I intended but by then I was past caring and figured I could fix them at the end. Next part!
It was really cool when I got to knit the sleeves onto the body stitches and even more exciting when I had to graft the live stitches from the armholes of the sleeves and body together. That actually worked out much easier than I'd thought it would which was nice. As I neared the yoke decreases I began to realize that I was about to run out of the charcoal body colour. Damn!Since there was going to be no other option I had to find another colour to work in. There was no way I was doing a grey neck since the grey was so pale it would look like dirty white and the red would just be like a beacon screaming "Look at me! Look at me!!" so I used black in the same brand as the charcoal and worked it in by alternating a row of charcoal and a row of black until the charcoal ran out. It worked a treat!
So this is a pic of the newly completed jumper, nothing's sewn in yet but you can see the black going up the neck and the hood being done entirely in it (with stripes, of course!).
What you can't see is how long the sleeves are!
And there we have it!
 In the end I couldn't convince myself that it wouldn't matter since I'd measured Eldest sons arms from his shoulder to his wrist and it came to 21 inches. The sleeves were about 26 inches. Clearly that was going to be a problem. In the end I chopped off three stripes and the cuffs and re-knit the cuffs at the new length. 23 inches. That should be more manageable!
And now for the final reveal!!
Front

Back
Too cool for words!

I am so chuffed with how this has turned out! It looks...wearable!! I swear when I give it to him I am SO getting photos!
Sigh...
Oh, yeah...now onto Youngest Sons Zip-Fronted one. Oooo. This could be interesting!
Let the Adventure continue!!

Tuesday, 5 March 2013

Finally!...Vintage Stockings!!

and I am NEVER doing them EVER AGAIN!!!
Okay, this was a kind of fun experiment but there are a few things I have discovered from the 40's-50's knitting pattern.
  • If there's a hard way or an easy way to do something, let's do it the hard way! Like knitting a sock flat despite the fact that we clearly know how to knit in the round because we do it for the toe of the stocking and ONLY THE TOE!!
  • That sewing miles of seams obviously has some moral lesson in it that escapes me because there is one looong one right down the back of the stocking and, just for good measure there are TWO seams on either side of the foot to join the sole to the instep! 
  • And just to make sure that you smarty pants don't try and squib out on all this convoluted construction, let's use a very simple appearing stitch that is IMPOSSIBLE TO CONVERT to a seamless version!!


You see I had a few issues with it. It was far and away the most frustrating thing I have ever knit and I've knit a lot of socks and even over the knee socks so you wouldn't have thought this would be such a fraught project!

See? Strange construction!!
 I unravelled the heel and foot portions over and over again, trying to make sense of the instructions. But finally, I climbed that mountain! I completed the Stockings!!


 I still don't like how the heel is formed, it's not smooth like a heel at all but pointy. But I have completed the pattern and BOY! am I thankful!!
:)

Thursday, 15 November 2012

Knitted Vintage Dress Experiment

I got brave and set about attacking a large project and knit a dress from a vintage pattern. I had just the pattern I wanted to try and it didn't look too complicated (don't you hate it when you tell yourself that on no other evidence than the picture??)
I had two cones of Gemini Acrylic 5ply which I thought would make an interesting contrast (besides realizing that the blue was going to run out long before I finished the whole dress. Ah well. Needs must.)  
And it was easy...too easy! 18 inches of stocking stitch which I chose to do in the round since the idea of having to do it separately twice  made me feel ill! But it seemed to go on FOREVER!! But finally I got to the end of that and started with the red for the bodice.
Now it started to look more like a dress and not an endless tube! It wasn't difficult doing the shaping for the v-neck and the armholes (had to go back to straight needles for that!) and quickly progressed through the sleeves. But that's where I finally hit some problems!
Do you see the ruffle here? It took me 5 tries to get the directions right! I'm the only one who can probably notice but the increases on one sleeve are much looser than the other sleeve. It took me a while to figure that out. And the lace just before the ruffle? That I fudged...a lot! I ended up getting a pattern from my Barbara Walkers stitch collections to find a pattern like the one I could barely see in the picture and used that. I simply couldn't get the pattern as written to make any sense at all!! But at last...I finished it!
...well, not quite...
As hard as I tried I couldn't understand the instructions for the crocheted edge that goes around the neck and ruffles. Crochet is SO not my thing and in the end I fudged this too. Or I might have been doing as I was supposed to but I just followed what the picture looked like. I also added it to the skirt because I thought it looked nicer that way.
So, huzzah!! I did it!
But there is something here you may have noticed and I didn't until I tried it on. The shoulders are hugely wide!! You'd have to be impossibly well built to be able to wear this or wearing killer shoulder pads! 
It hangs over my shoulders by about 5cms. I tried to convince myself that it wouldn't matter but it does, oh heck it does!! So it's been relegated to the naughty corner so I can cogitate on it and figure out what my best option is with it. It might have to wait till winter. It is truly horrendous trying this on in 30C heat!
But it has been a great experiment :)

Happy knitting :)