Showing posts with label experiment. Show all posts

Saturday, 7 March 2015

But some experiments don't work, so...

You just have to bite the bullet and move on.

Speaking of my last post...

...I looked at it some more and decided...I really didn't like it...so I...


...unravelled the whole thing down to one starter square! See? There it is, right at the bottom. And THAT became my new starting point!

I decided not to tinker with this and just knit it the way it is supposed to go, generally speaking.


I used 5 different sock-yarn colours from Moda Vera Noir 4 ply range and decided to do a square 9 squares high and 9 in width. That should get a nice shuffle between the different variegated yarns involved and as I ran out of one colour I'd just bring in a new one from my collection. There is one yarn that isn't Noir, a pretty Patons Patonyle I had a bit left over of, so I thought I may as well use up the last little bit. It fits in quite well!
  

But watching it grow is SO absorbing! I'm enjoying this much more than my first attempt. All the different colours and patterns are really quite nice with no big blocks of colour sounding any discordant notes. And it's very relaxing.


Both a nice mindless knit while at the same time not boring at all! I find myself having to make myself put it down! To stop telling myself, "Oh, I'll put this down when I get to this point in the decreases...oh look! I've nearly finished the square, I may as well finish it...Oh, I'll just pick up the stitches I need for the next square so It's ready when I..."

You get the idea?


Here I've got 4 squares width...


...And now 5 squares...


Doesn't it look lovely? I love running my hands over it and feeling the lines running diagonally across it because of the decreases down the middle. 


And now 6 squares wide. I've actually started the seventh row now and the end result of a cushion is looking pretty good! And although I love this way of join-as-you-go construction, I'm not sure I'm so in love with it that I'd want to commit to a whole blanket like this!

But all in all, I think the sacrifice of my first idea was a valid choice. This is now something I like to look at and touch. Not something tinged with a little regret.

Have you had to change an idea of something you thought would really work when it wasn't developing as you'd imagined? Any craft has that propensity! Tell me about it and share!

See you all later!
Dx 


Saturday, 28 February 2015

A new Experiment!

Domino Knitting!

I've heard of this and there was no particular reason I decided to have a go at it besides the fact that I have a few balls of left-over sock yarn in my wool room and the plain truth that the other thing I was knitting was in a heavier gauge of yarn and I liked the idea of something delicate...like 4 ply. I mean, it's not like I have any lack of sources of sock yarn to fall back on!

Anyway, I found a really helpful tutorial on Pinterest on a blog called Loose Threads all about how to do it to produce beauties like this!


But I didn't like the jagged edge. I wanted a straight edge. So after reading about half the instructions and quickly flicking through the pictures I grabbed the top ball of left-overs, a 2mm circular needle (a really short one!) and dove in!


First I knit the four on the right and worked out how the placements of the decreases worked. I really like the way the slip 2, knit 1, pass 2slsts over knit st make a really neat line in the centre. But I still had a fair amount of yarn left so I decided I'd make a square twice the size to sit next to the smaller ones. I quite liked how that looked and decided to surround this rectangle as I went around.

I mean, how hard could it be?


See? Isn't it pretty? And a nice predictable pattern developing too. Always a large square beside the 4 smaller squares.  I really quite liked this kind of joining as you go along and with the fine yarn it's not too hot to do while it's uncomfortable warm either!  Okay, moving on...


All going along really well although it's hard to know whether to try and match the colours better but I decided in the end to just go with whatever I grabbed next.


And right here! Right here I suddenly realized I may have outsmarted myself. I had discovered earlier that there had to be an order in how you knitted each square or else the line down the middle could end up pointing the wrong way but I didn't thing it would really be a problem...until I started trying to go down the right side of the centre rectangle. To do the little squares with the line going in the right direction I had to some how join THREE sides instead of the usual two.

Pause...Think...Grind Teeth! (buggerbuggerbugger!!)

So I decided that I'd just have to come up with a way of doing that. Not that it was difficult, just a little fiddly! And now I know why there aren't any examples of small and large squares in a straight edged blanket like this!


So, using a single double point 2mm needle I picked up 15sts on the third side and every back row I knit together the first st on the working needle with one from the third side. It works pretty well. It's not quite as smooth a join as the normal one used through out the pattern but it functions and for that I'm prepared to be thankful!

Of course all this is still in progress and my aim at the moment is to finish the large square I'm doing and make a cushion cover with it. And then I'll sit back and contemplate the wonders now at my fingertips of greater and larger things... Like maybe a sock yarn blanket myself. Yes, that might be nice...

Well, one day maybe anyway :)

Anyone else ever experimented with domino or modular knitting?

See you later!
Dx

Tuesday, 5 March 2013

Finally!...Vintage Stockings!!

and I am NEVER doing them EVER AGAIN!!!
Okay, this was a kind of fun experiment but there are a few things I have discovered from the 40's-50's knitting pattern.
  • If there's a hard way or an easy way to do something, let's do it the hard way! Like knitting a sock flat despite the fact that we clearly know how to knit in the round because we do it for the toe of the stocking and ONLY THE TOE!!
  • That sewing miles of seams obviously has some moral lesson in it that escapes me because there is one looong one right down the back of the stocking and, just for good measure there are TWO seams on either side of the foot to join the sole to the instep! 
  • And just to make sure that you smarty pants don't try and squib out on all this convoluted construction, let's use a very simple appearing stitch that is IMPOSSIBLE TO CONVERT to a seamless version!!


You see I had a few issues with it. It was far and away the most frustrating thing I have ever knit and I've knit a lot of socks and even over the knee socks so you wouldn't have thought this would be such a fraught project!

See? Strange construction!!
 I unravelled the heel and foot portions over and over again, trying to make sense of the instructions. But finally, I climbed that mountain! I completed the Stockings!!


 I still don't like how the heel is formed, it's not smooth like a heel at all but pointy. But I have completed the pattern and BOY! am I thankful!!
:)

Thursday, 15 November 2012

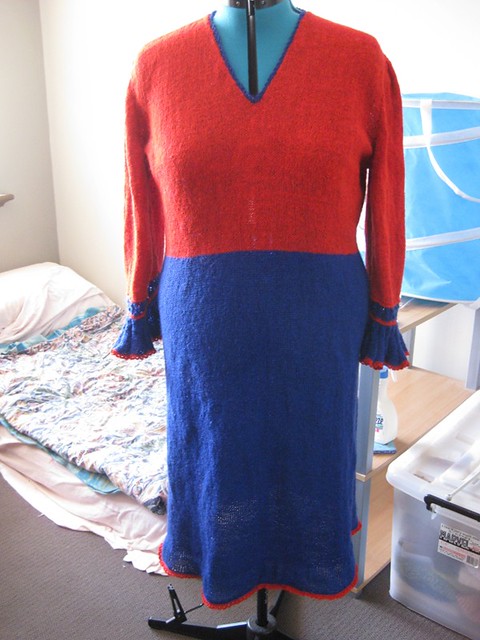
Knitted Vintage Dress Experiment

I got brave and set about attacking a large project and knit a dress from a vintage pattern. I had just the pattern I wanted to try and it didn't look too complicated (don't you hate it when you tell yourself that on no other evidence than the picture??)
I had two cones of Gemini Acrylic 5ply which I thought would make an interesting contrast (besides realizing that the blue was going to run out long before I finished the whole dress. Ah well. Needs must.)  
And it was easy...too easy! 18 inches of stocking stitch which I chose to do in the round since the idea of having to do it separately twice  made me feel ill! But it seemed to go on FOREVER!! But finally I got to the end of that and started with the red for the bodice.
Now it started to look more like a dress and not an endless tube! It wasn't difficult doing the shaping for the v-neck and the armholes (had to go back to straight needles for that!) and quickly progressed through the sleeves. But that's where I finally hit some problems!
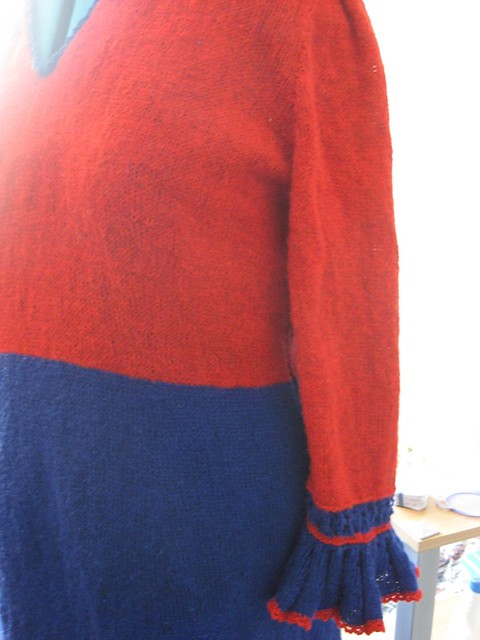
Do you see the ruffle here? It took me 5 tries to get the directions right! I'm the only one who can probably notice but the increases on one sleeve are much looser than the other sleeve. It took me a while to figure that out. And the lace just before the ruffle? That I fudged...a lot! I ended up getting a pattern from my Barbara Walkers stitch collections to find a pattern like the one I could barely see in the picture and used that. I simply couldn't get the pattern as written to make any sense at all!! But at last...I finished it!
...well, not quite...
As hard as I tried I couldn't understand the instructions for the crocheted edge that goes around the neck and ruffles. Crochet is SO not my thing and in the end I fudged this too. Or I might have been doing as I was supposed to but I just followed what the picture looked like. I also added it to the skirt because I thought it looked nicer that way.
So, huzzah!! I did it!
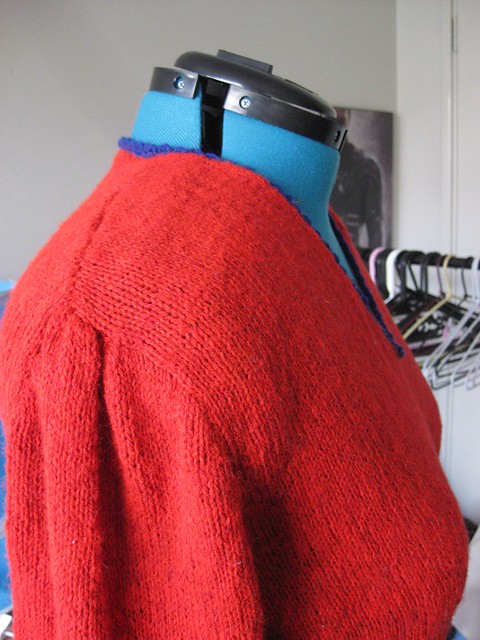
But there is something here you may have noticed and I didn't until I tried it on. The shoulders are hugely wide!! You'd have to be impossibly well built to be able to wear this or wearing killer shoulder pads! 
It hangs over my shoulders by about 5cms. I tried to convince myself that it wouldn't matter but it does, oh heck it does!! So it's been relegated to the naughty corner so I can cogitate on it and figure out what my best option is with it. It might have to wait till winter. It is truly horrendous trying this on in 30C heat!
But it has been a great experiment :)

Happy knitting :)